1.2 Quick Start 
Rendering a single morph is not particularly interesting. Let’s render some labels, a text input, and a button to implement a simple application.
In a new Workspace, select and invoke the following code. Use Ctrl+a to select All, then Ctrl+d to DoIt.
| view input greetingLabel button row |

view := LayoutMorph newColumn.

"Create a single-line text input.
 Using zero for the height causes it to calculate
 the minimum required height for a single line."
input := TextModelMorph withText: '' ::
    hideScrollBarsIndefinitely;
    morphExtent: 200 @ 0;
    wrapFlag: false.

greetingLabel := LabelMorph contents: '' ::
    color: Color red;
    font: FontFamily defaultFamilyAndPointSize bold.
"Create a button that when clicked executes
the associated block of code"
button := PluggableButtonMorph
    model: [greetingLabel contents: 'Hello, ', input text, '!']
    action: #value.
button label: 'Greet'.

row := LayoutMorph newRow
    gap: 10;
    addMorph: (LabelMorph contents: 'Name:');
    addMorph: input;
    addMorph: button.

view
    padding: 20;
    addMorph: row;
    addMorph: greetingLabel;
    openInWorld
Example 1.2: My first layout
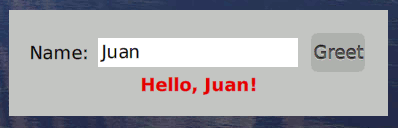
Figure 1.1: My first interface
This morph, which is similar to a "Hello World" panel, should be inserted into a window with a proper title and icon. To remove this panel, you need to again request its halo, which is not very practical. Let’s change the simple app we’ve built so it can be contained within a window. In the previous code, edit the end of the script to insert our view into a SystemWindow instance.
Again, select the entire script and invoke it.
[...]
view
    padding: 20;
    addMorph: row;
    addMorph: greetingLabel.

SystemWindow new ::
   setLabel: 'Hello World!';
   addMorph: view;
   openInWorld;
   morphExtent: 300@100
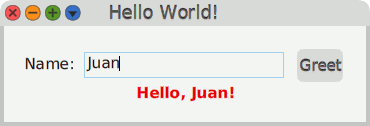
Figure 1.2: My first window