2.2 Alignment 
For a row LayoutMorph, the major axis is x, and the minor axis is y. For a column LayoutMorph, the major axis is y, and the minor axis is x.
If a LayoutMorph is given a width or height that is larger than needed to fit the submorphs, we can specify how the submorphs should be aligned. By default, the submorphs will be aligned at the beginning of the LayoutMorph’s major axis and centered on its minor axis.
You can lengthen the layout by increasing its morphExtent. For a row LayoutMorph: layout morphExtent: (layout morphExtent + (80 @ 0)). Another way of doing this is to get the row LayoutMorph’s halo and drag the yellow Change size button (found at the lower right) to the right.

Figure 2.5: Default alignment
To change the major axis alignment, send the message #axisEdgeWeight: to the layout morph with a floating-point argument between 0 and 1. The argument should be 0 for left-align, 0.5 for center, or 1 for right-align. The following symbols can also be used for the argument:
- For rows. #rowLeft, #center, or #rowRight,
- For columns. #columnTop, #center, or #columnBottom.
For example, you can center your submorphs like this:
layout axisEdgeWeight: #center.

Figure 2.6: Center alignment
To change the minor axis alignment, send the message #offAxisEdgeWeight: to each submorph with a floating-point argument. It takes the same argument values as the #axisEdgeWeight: message. Again, this message must be sent to each submorph, not to the LayoutMorph:
layout submorphsDo: [:submorph |
   submorph layoutSpec offAxisEdgeWeight: 0]
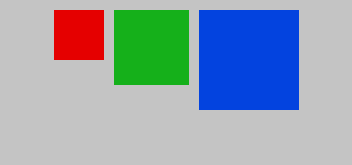
Figure 2.7: Top alignment
Alternatively to numeric value arguments, symbols can be used:
- For rows. #rowTop, #center, #rowBottom,
- For columns. #columnLeft, #center, #columnRight.
Browse the method offAxisEdgeWeight: to discover more symbols.
Edit the example Example 2.1 so that box1 sits at the top of its owner, box2 in the middle, and box3 at the bottom.
Exercise 2.1: Top to bottom