2.1 To Row or Not to Row 
LayoutMorph instances arrange submorphs in a row or column and are created with LayoutMorph newRow or LayoutMorph newColumn. An instance cannot be created with LayoutMorph new because a direction must first be chosen.
The submorphs must be instance subclasses of PlacedMorph. The LayoutMorph is such a class, so they can be nested, which allows for practically any layout.
Let’s lay out three instances of ColoredBoxMorph. Using this kind of morph for our examples allows us to clearly see their bounds:
box1 := ColoredBoxMorph new color: Color red; morphExtent: 50 @ 50.
box2 := ColoredBoxMorph new color: Color green; morphExtent: 75 @ 75.
box3 := ColoredBoxMorph new color: Color blue; morphExtent: 100 @ 100.
layout := LayoutMorph newRow
    addMorph: box1;
    addMorph: box2;
    addMorph: box3;
    openInWorld
Example 2.1: Layout base example

Figure 2.1: Basic use of LayoutMorph
By default, there is no space between the edges of the LayoutMorph and its submorphs, and there is no space between the submorphs.
To add 10 pixels of space between the edges of the LayoutMorph and its submorphs, send layout padding: 10. If the argument is a Point, its x value is used for left and right padding, and its y value is used for top and bottom padding.
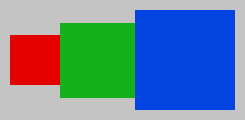
Figure 2.2: Adding padding
To add 10 pixels of space between the submorphs, send layout gap: 10.

Figure 2.3: Adding gap
To add both padding and gap in a single message, do layout separation: 10.

Figure 2.4: Separation applies 10 to both gap and padding