3.2 Red to Medic Cross 
Let’s take a look at Sample01Cross and its unique drawOn: method:
drawOn: aCanvas
aCanvas strokeWidth: 8 color: Color lightOrange fillColor: Color red do: [
aCanvas polyLine: { 100@0 . 140@0 . 140@240 . 100@240 . 100@0 } ].

aCanvas strokeWidth: 8 color: Color lightOrange fillColor: Color red do: [
aCanvas polyLine: { 0@100 . 0@140 . 240@140 . 240@100 . 0@100 } ]
It produces a cross by drawing two red rectangles with an orange border. The polyLine: method accepts an arbitrary number of points to designate the vertices of the polygon. We can improve how it is rendered.

Figure 3.2: A Sample01Cross shape with two rectangles
Edit the drawOn: method to render a cross as shown in the image below (Figure 3.3).
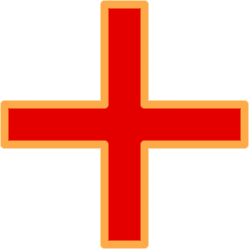
Figure 3.3: A better looking cross
Exercise 3.1: Better looking shape
The method names involved in the code above will look familiar to users acquainted with SVG (Scalable Vector Graphics)4. The API is, in fact, inspired by its specifications, and it may serve as a loose reference5. Nevertheless, your primary reference for available drawing operations is the AbstractVectorCanvas class, then some bits of its parent class, MorphicCanvas.
In this class, the methods are spread in two important categories:
the helper methods of the drawing - categories and the
fundamental Vector Graphics protocol in the paths &
strokes categories.
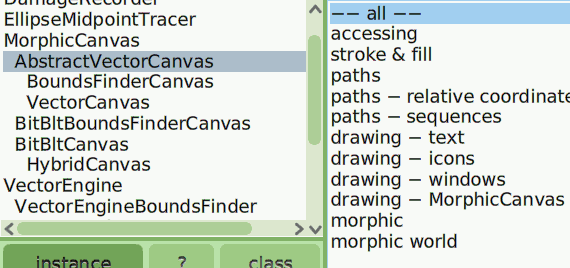
Figure 3.4: Method categories of the AbstractVectorCanvas
In its drawing - MorphicCanvas category, observe how its helper
method, to draw a straight line, relates to the Vector Graphics
engine:
line: pt1 to: pt2 width: morphStrokeWidth color: aStrokeColor
self strokeWidth: morphStrokeWidth color: aStrokeColor do: [
   self moveTo: pt1.
   self lineTo: pt2 ]
In the strokeWidth:color:do: method above, the argument of the do: keyword is a block of code that defines the path; it describes the outline of the shape to construct. It blends very nicely into the Smalltalk syntax as a block of code. Your drawing operations should always be presented in such a block. Of course, it can be factored into several smaller methods or iterative processes, making it a very powerful means for drawing.
The stroke & fill method category contains methods for adjusting
the style of the path’s stroke. Overall, there are four categories of
parameters to work with:
- width. A floating-point number representing the width of the line.
- color. The color of the stroke, which is a Cuis-Smalltalk Color instance.
- fill color. The filling color, a Color instance.
- dash style. There are three different parameters to define the style of the line.
To be able to use floating-point numbers instead of integers helps to achieve smoother visual rendering. To illustrate this, let’s turn our simple cross into a flashing medical cross.
Let’s copy the class as MedicCross and add a width attribute:
PlacedMorph subclass: #MedicCross
   instanceVariableNames: 'width'
   classVariableNames: ''
   poolDictionaries: ''
   category: 'ArtOfMorph'
We initialize it properly:
initialize
super initialize.
width := 0
To pulse the cross, we use the morphic’s step mechanism, generally involving 3 methods: in our MedicCross, the step method is continuously executed at a period indicated by its stepTime method (in milliseconds).
CrossMedic >> stepTime
^ 10
Then, to enable stepping, its wantsSteps method must return true:
CrossMedic >> wantsSteps
^ true
Exercise 3.2: step method makes it pulse

Figure 3.5: A flashing medic cross
In the next section, we will go a step further by representing a real-world object: a simple ruler.